Share
How to Create Blockchain in Python: Step-by-Step Guide

- BLOG
- Blockchain
- October 14, 2025
Building a blockchain from the beginning can seem difficult, but Python makes it simple. Python’s easy-to-read code and useful tools help anyone create a basic blockchain fast, even if they don’t have a lot of technical knowledge.
According to a 2023 survey by the Python Software Foundation and JetBrains, Python remains one of the most popular languages, widely used for blockchain development and other fields.
This guide will show you how to create blockchain in Python, step by step. Even if you’re new, you’ll learn the basics and build your own blockchain. Let’s start!
Contents
- 1 What Is a Blockchain and How Does It Work in Python?
- 2 Why Python Is Ideal for Blockchain Development
- 3 Tools and Libraries You Need to Build a Blockchain in Python
- 4 Key Concepts to Understand Before You Code a Blockchain in Python
- 5 Step-by-Step Guide: How to Create a Blockchain in Python
- 5.1 Step 1: Set Up a Place to Store Blocks and Create the First Block
- 5.2 Step 2: Get the Last Block in the Chain
- 5.3 Step 3: Create a Puzzle (Proof of Work) to Secure Block Addition
- 5.4 Step 4: Calculate the Hash of a Block to Link Blocks
- 5.5 Step 5: Check if the Entire Blockchain is Valid
- 5.6 Step 6: Build a Simple Website to Mine Blocks and View the Chain
- 5.7 Summary:
- 6 Common Mistakes to Avoid When Creating a Blockchain in Python
- 6.1 Not Initializing the Chain Properly
- 6.2 Ignoring the Proof of Work Puzzle
- 6.3 Incorrectly Linking Blocks
- 6.4 Using Mutable Data Structures in Blocks
- 6.5 Skipping Hash Validation When Verifying Chain
- 6.6 Not Handling Time Properly
- 6.7 Not Using Secure Hash Functions
- 6.8 Running Heavy Computation on the Main Thread (in Web Apps)
- 7 Next Steps: Real-World Use Cases and Scaling Your Python Blockchain
- 8 How Webisoft Can Help You in Your Blockchain Journey
- 9 In Closing
- 10 Frequently Asked Questions
What Is a Blockchain and How Does It Work in Python?
A blockchain is a special kind of database that stores information in blocks, and these blocks are linked (or chained) together in order. It’s mostly known for powering cryptocurrencies like Bitcoin, but it can be used for many things like tracking products, contracts, or digital records.
Key features:
- Decentralized: No single owner or control.
- Secure: Once data is added, it’s very hard to change.
- Transparent: Everyone can see the chain and verify it.
But how does it actually work in Python?
- First, transactions are requested (like sending coins).
- Then, the transaction is grouped with others into a block.
- After that, the block is sent to a network of computers (called nodes).
- Next, the nodes verify the block using algorithms.
- Once verified, the block is added to the chain.
- Finally, the change is now visible to everyone in the network.
Why Python Is Ideal for Blockchain Development
Python is a great choice for blockchain in python because it’s simple, flexible, and has many built-in tools. Its clean syntax makes it easier for beginners and professionals to write blockchain code quickly. So let’s explore some amazing advantages!
- Easy to Learn and Use: Python’s simple syntax makes writing and understanding blockchain code much easier—especially for beginners and rapid prototyping.
- Fast Development Speed: With Python, you can build blockchain applications quickly because of its clean, readable code and many ready-to-use libraries.
- Strong Libraries and Frameworks: Python has powerful libraries (like hashlib for hashing, flask for building web APIs, and others) that simplify blockchain tasks such as cryptography, networking, and data handling.
- Good Community Support: Python has a large, active community. You can easily find tutorials, guides, and open-source blockchain projects to learn from or use.
- Cross-Platform: Python runs on almost every platform (Windows, Linux, macOS), making it flexible for blockchain development in different environments.
Tools and Libraries You Need to Build a Blockchain in Python
Before you start developing blockchain in Python, you need the right tools. In this part, you’ll find out which libraries and setups will make your work faster and easier.
| Tool / Library | Purpose | Description | Example Use Case |
| hashlib | Hashing | Secure hashing functions like SHA-256 | Creating block hashes to secure block data |
| Flask | Web framework | Lightweight API building | Building a REST API for blockchain node communication |
| requests | HTTP requests | Sending HTTP requests | Sending transactions between blockchain nodes |
| json | Data serialization | Encoding/decoding JSON data | Formatting blocks and transactions for network transfer |
| ecdsa | Cryptography (digital signatures) | Creating/verifying signatures | Signing transactions to verify sender identity |
| pycryptodome | Cryptography | Encryption and hashing algorithms | Encrypting sensitive data and hashing transactions |
| time | Timestamping | Adding timestamps | Timestamping blocks when they are created |
| socket | Networking | Node communication | Enabling peer-to-peer messaging between blockchain nodes |
| threading | Concurrency | Running parallel processes | Listening to multiple node requests at the same time |
| SQLAlchemy | Database ORM | Storing blockchain data persistently | Saving blocks and transactions in a database |
| pytest | Testing | Automated testing | Testing blockchain functions to ensure correctness |
Key Concepts to Understand Before You Code a Blockchain in Python
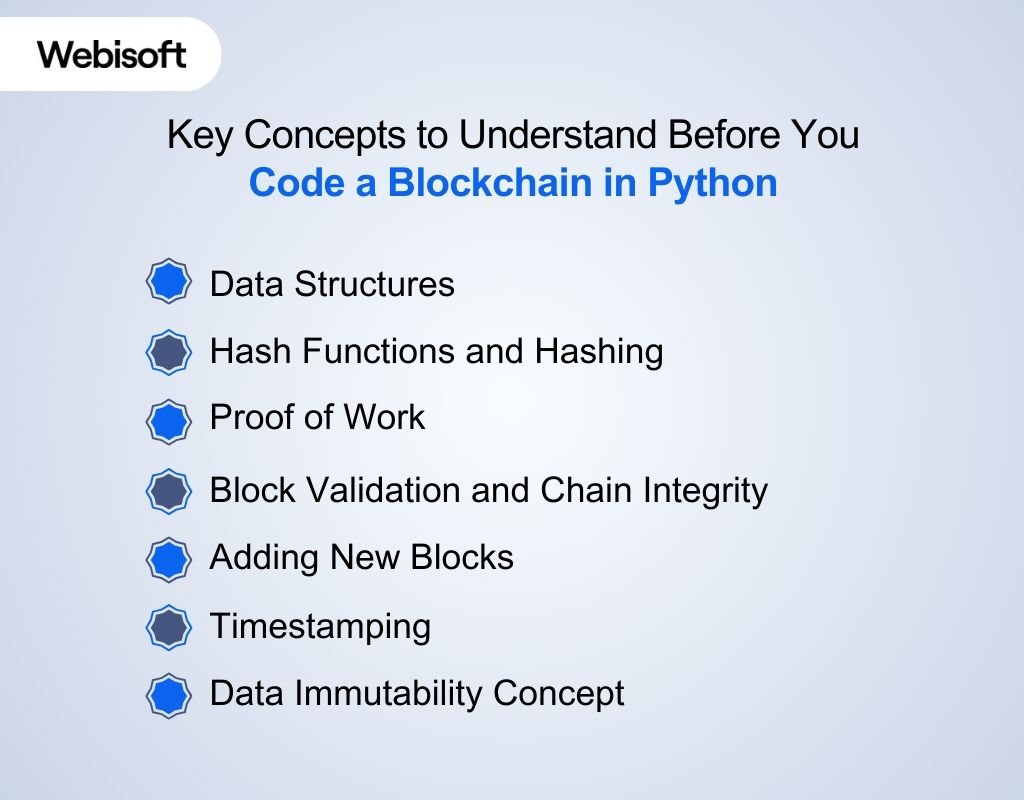
Before learning how to create blockchain in Python, you should understand key ideas like blocks, hashing, proof of work, and distributed networks. These concepts are the foundation for building a working blockchain.
Data Structures (Blocks and Chains)
You need to understand how to design a block as a data structure that holds important information like index, timestamp, data, previous hash, and hash. Also, how to connect these blocks in a list or chain format, where each block links to the previous one via the previous hash.
Hash Functions and Hashing
Hashing is fundamental. You must know how to use hash functions (like SHA-256) to generate a unique hash for a block’s data. Hashing ensures data integrity because even a small change in input data produces a very different hash. Python’s hashlib module helps you implement this.
Proof of Work (Mining Algorithm)
Learn how to implement a simple proof of work mechanism that requires finding a nonce value to generate a hash that meets a difficulty condition (like leading zeros). This prevents easy block creation and secures the chain.
Block Validation and Chain Integrity
Understand how to validate a block by checking if the previous hash recorded matches the actual hash of the previous block, and if the block’s hash is valid. This helps maintain the integrity of the entire chain.
Adding New Blocks
Know how to add new blocks to the chain by creating a block, computing its hash (with proof of work), and linking it properly by referencing the previous block’s hash.
Timestamping
Each block should store the time it was created. You should know how to get the current time in Python and store it in the block to track when data was added.
Data Immutability Concept
Be clear about how once a block is added, its data should not be changed because altering it would change the hash and break the chain. This concept influences how you manage block data and chain updates.
Step-by-Step Guide: How to Create a Blockchain in Python
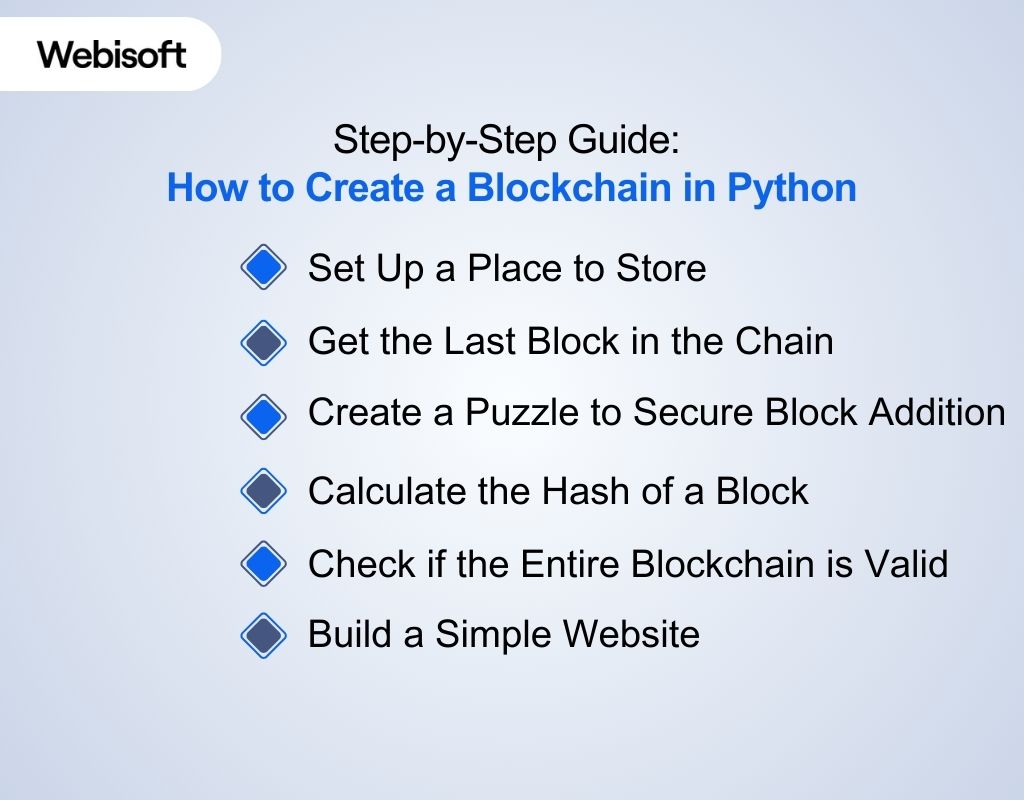
This guide will show you how to create blockchain in python step by step. You’ll learn how to build blocks, link them, and add basic features like proof of work and web access.
Step 1: Set Up a Place to Store Blocks and Create the First Block
We need a container to hold all the blocks in the blockchain. This container is a class called Blockchain. When we start the blockchain, it should have the very first block (called the “genesis block”) so the chain begins properly.
Code:
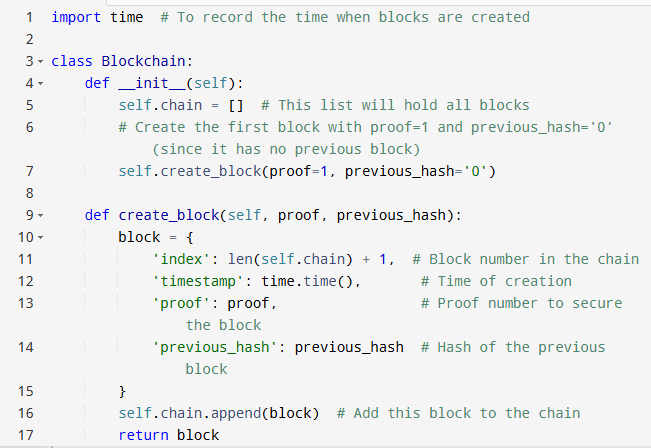
Explanation:
- self.chain stores all blocks in order.
- create_block builds a block with 4 pieces of info: index, timestamp, proof, and previous_hash.
- The first block is special: proof is 1, and previous_hash is ‘0’ because no blocks came before it.
- When the Blockchain object starts, it automatically creates this first block.
Step 2: Get the Last Block in the Chain
When we add a new block, it must point back to the last block. So, we need a way to quickly get the most recent block.
Code:

Explanation:
- self.chain[-1] accesses the last block in the list.
- We will use this block’s proof and hash to link the next block properly.
Step 3: Create a Puzzle (Proof of Work) to Secure Block Addition
Without any rule, anyone could add fake blocks easily. We add a puzzle that takes time to solve — called Proof of Work. Only after solving this puzzle can we add a block.
Code:

Explanation:
- This code tries numbers (new_proof) one by one.
- It creates a hash of the difference between squares of new_proof and previous_proof.
- The goal is to find a number so that the hash starts with ‘0000’, which is hard to get and takes time.
- Once found, this number is returned as proof, securing the block.
Step 4: Calculate the Hash of a Block to Link Blocks
Each block needs a unique identifier called a hash. This hash is stored in the next block to maintain the chain’s security and order.
Code:

Explanation:
- Convert the block’s contents to a string, then to bytes because hashing works on bytes.
- Use SHA-256 to generate a fixed-length unique hash.
- Even a tiny change in the block changes the hash completely, making tampering easy to detect.
Step 5: Check if the Entire Blockchain is Valid
We want to verify that none of the blocks in the chain have been changed. We do this by checking that each block’s previous_hash matches the real hash of the previous block and the proof of work is correct.
Code:


Explanation:
- Loop through the chain starting at block 2.
- For each block, check if the stored previous_hash matches the actual hash of the previous block.
- Also, check the proof of work is valid by recalculating the hash puzzle.
- If all checks pass, the chain is valid.
Step 6: Build a Simple Website to Mine Blocks and View the Chain
To interact with the blockchain easily, we create a web server with two pages:
- One to mine a new block (run the proof of work and add the block)
- One to show the full blockchain
Code:


Explanation:
- Flask web server handles requests.
- /mine_block endpoint runs the proof of work, adds a block, and returns its details.
- /get_chain endpoint returns the whole blockchain in JSON format.
- Run the app, open the browser to http://localhost:5000/mine_block to mine blocks, and /get_chain to see the chain.
Summary:
- First, you create a class to store and manage blocks.
- Then, add the very first block (genesis).
- Get the last block before adding new ones.
- Add a puzzle (proof of work) to secure adding blocks.
- Hash each block to create unique links.
- Validate the whole chain to detect tampering.
- Use a simple web server so anyone can interact with your blockchain.
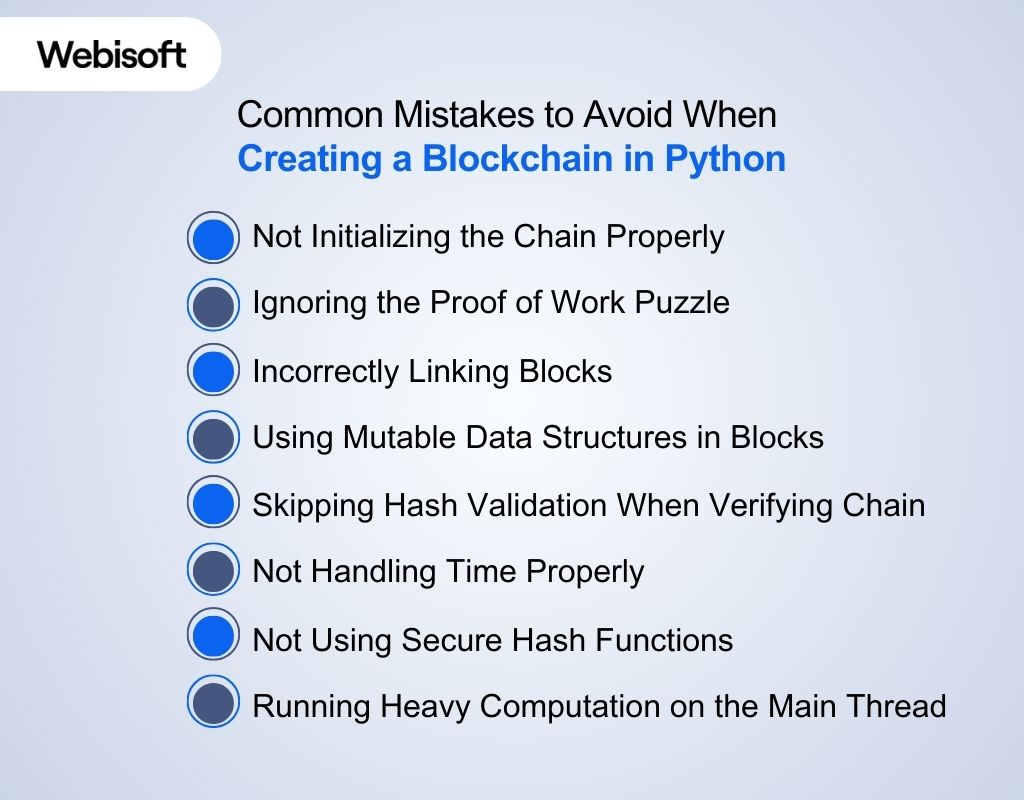
Common Mistakes to Avoid When Creating a Blockchain in Python
While learning how to build blockchain in python, people often make mistakes like skipping security checks or not testing properly. Knowing these early will help you avoid problems later.
Not Initializing the Chain Properly
If you don’t create the first block (genesis block) correctly, your chain will have no starting point. This makes adding new blocks impossible or invalid.
Avoid: Forgetting to create the first block in the constructor or starting with an empty chain.
Ignoring the Proof of Work Puzzle
Skipping the proof of work means anyone can add blocks instantly, which breaks blockchain security. Without this, your chain can be easily tampered with.
Avoid: Not implementing a computational puzzle or validation to secure new blocks.
Incorrectly Linking Blocks
Each block must store the hash of the previous block. If this link is broken or wrong, the chain won’t be valid and anyone can change data undetected.
Avoid: Forgetting to store or check the previous block’s hash when creating or validating blocks.
Using Mutable Data Structures in Blocks
Blocks should be treated as immutable once created. If you accidentally modify block data later, it changes the hash and breaks the chain.
Avoid: Changing block contents after adding them to the chain.
Skipping Hash Validation When Verifying Chain
Only checking block indexes or timestamps isn’t enough. You must check both the hash links and proof of work for each block to ensure chain integrity.
Avoid: Validating chain with incomplete checks, risking acceptance of tampered blocks.
Not Handling Time Properly
Using local system time without standard formatting or time zones can cause inconsistent timestamps.
Avoid: Ignoring timestamp consistency, which can affect ordering and validation.
Not Using Secure Hash Functions
Choosing weak or custom hash functions instead of proven ones like SHA-256 reduces security.
Avoid: Using non-standard hashing or simple checksums for block hashes.
Running Heavy Computation on the Main Thread (in Web Apps)
Running proof of work or other heavy calculations directly in the web request can freeze the server or slow responses.
Avoid: Blocking web requests with slow mining—use background tasks or queues in real apps.
Next Steps: Real-World Use Cases and Scaling Your Python Blockchain
After learning how to create blockchain in Python and building a basic one, the next step is to use it in real-life projects and scale it. From tracking products to managing digital records, there are many ways to use your Python-based blockchain effectively.
| Real-World Use Case | Description | How to Scale Your Python Blockchain |
| Cryptocurrency | Digital money like Bitcoin uses blockchain for secure transactions. | Optimize proof of work, add peer-to-peer network to sync chains. |
| Supply Chain Tracking | Track products from origin to delivery with transparency. | Add data fields for product info, build APIs for external access. |
| Healthcare Records | Secure patient data shared only with permission. | Implement encryption, permission controls, and secure APIs. |
| Voting Systems | Transparent and tamper-proof voting results. | Use identity verification and faster consensus algorithms. |
| Digital Identity | Manage personal identity securely online. | Integrate decentralized ID standards and privacy features. |
| Smart Contracts | Automated agreements executed on the blockchain. | Add a virtual machine or interpreter to run contract code. |
| Real Estate Transactions | Record property ownership and sales transparently. | Develop secure document storage and multi-signature support. |
| Data Provenance | Track origin and changes of data in industries. | Use timestamping and immutable logs for audit trails. |
How Webisoft Can Help You in Your Blockchain Journey

Starting with blockchain can feel confusing. But with Webisoft, it becomes simple. We guide you from the first step to the final success. Whether you’re a small business or a growing company, we build safe, fast, and smart blockchain solutions just for you.
Here’s how Webisoft can help:
- Understand Your Needs: We listen first. Then we plan the best way to use blockchain for your business.
- Build Custom Blockchain Solutions: Every business is different. We create blockchain tools that fit your needs perfectly.
- Create Smart Contracts: We write smart contracts that work automatically and keep your deals safe.
- Develop Decentralized Apps (DApps): We build apps that are safe, fast, and always online—great for your users.
- Help You Connect With Your Old Systems: No need to change everything. We make sure blockchain works with what you already use.
- Make Tokenization Easy: We turn things like assets or points into secure digital tokens—ready to grow and scale.
- Give You Clear Advice and Support: Not sure what to do next? Our experts help you every step of the way.
- Keep Everything Safe and Fast: We focus on strong security and smooth performance, so you can relax and grow.
Learn more about our blockchain development services.
In Closing
Learning how to create blockchain in Python is a great way to understand blockchain fundamentals, but it takes careful steps to get it right. You start by building each block and linking them securely, which creates a transparent and tamper-proof chain.
No doubt, Python’s simplicity makes blockchain creation easier, yet it still requires focus on the core logic behind this technology. However, if you ever need expert help to build secure, efficient, and scalable blockchain solutions, Webisoft is ready to guide you through the process with deep technical expertise.
Frequently Asked Questions
How long does it take to build a basic blockchain using Python?
You can build a very simple version in a few hours, depending on your Python skills. But understanding and extending it like adding transactions, validation rules, or peer connections, might take a few days or weeks of practice.
Do I need to learn Flask or Django to build a blockchain in Python?
Not for the core logic. But if you want to:
- Expose your blockchain as an API
- Interact with it through a browser or other nodes
- Then learning Flask (a lightweight web framework) is very helpful. You can simulate a network of nodes this way.
What can I add to make my Python blockchain more advanced?
Once the basics work, try adding:
- A transaction system
- Digital signatures using ecdsa
- Proof-of-work or proof-of-stake
- Flask-based REST API to create multiple nodes
- A simple P2P communication layer
Each feature deepens your understanding of real blockchain architecture.
