Share
How to Build a Blockchain Network Using Hyperledger Fabric

- BLOG
- Blockchain
- October 11, 2025
Setting up a blockchain might sound simple until you’re staring at cryptic YAML files, Docker containers, and failed peer connections. If you’re trying to build a secure, permissioned blockchain for enterprise use, Hyperledger Fabric is one of the most powerful platforms available.
This guide walks you through how to build a blockchain network using Hyperledger Fabric, step by step from setting up your environment and generating certificates to launching the network, deploying chaincode, and running real transactions.
We focus on practical, verifiable steps not theory. So you can see your network come to life, understand what each component does, and troubleshoot issues as they arise. If you’ve struggled with the official documentation or want a structured walkthrough that actually works, this is your starting point.
Contents
- 1 Why Use Hyperledger Fabric?
- 2 Build your blockchain network using Hyperledger Fabric with Webisoft now!
- 3 Essential Components for Building a Hyperledger Fabric Blockchain
- 4 What You Need Before You Start Building Blockchain using Hyperledger Fabric
- 5 How to Build a Blockchain Network Using Hyperledger Fabric (Step-by-Step)
- 5.1 Step 1: Set Up Your Development Environment
- 5.2 Step 2: Define Network Participants and Roles
- 5.3 Step 3: Generate Crypto Material and Channel Artifacts
- 5.4 Step 4: Launch Core Network Services
- 5.5 Step 5: Create the Channel and Join Peers
- 5.6 Step 6: Deploy Chaincode (Smart Contract Logic)
- 5.7 Step 7: Run Transactions and Query the Ledger
- 5.8 Step 8: Confirm Your Network is Operational
- 5.9 (Optional) Step 9: Upgrade to a Production-Ready Setup
- 6 How to Know If the Blockchain Network is Working
- 7 Troubleshooting Common Hyperledger Fabric Setup Errors
- 8 What’s Next? Turn Your Network Into a Real Project
- 9 How Can Webisoft Help in Building a Blockchain Network using Hyperledger Fabric
- 10 Conclusion
- 11 FAQs
Why Use Hyperledger Fabric?
Not every blockchain needs to be public like Ethereum. If you’re building a chain where privacy, permissions, and control actually matter, Hyperledger Fabric is the better fit. Here’s why developers and enterprises choose it:
- It gives you control over who joins your network and what they can do
- You can share data privately between specific organizations; not everyone sees everything
- It’s built for real businesses that need security, trust, and speed
- You can write custom logic using Go or Node.js
- Every user is verified, so you know exactly who’s doing what
- Big companies like Walmart and IBM use it because it’s stable and open source.


Build your blockchain network using Hyperledger Fabric with Webisoft now!
Schedule a free consultation – Build a secure & scalable blockchain network today.
Essential Components for Building a Hyperledger Fabric Blockchain
Want to know how to build a blockchain network using Hyperledger Fabric? Hyperledger Fabric is a modular framework composed of multiple interoperable components. Knowing the core components of it will help you to know what pieces you’re working with. Here are the components:
- Peers: These are the nodes that hold the ledger and run smart contracts (chaincode). Each organization has its own peers.
- Orderer (Ordering Service): This is the component that ensures all transactions are added to the blockchain in the right order.
- Certificate Authority (CA): It issues digital identities to every participant, like users, admins, and peers. Without these, no one can do anything on the network.
- Ledger: It’s the record of everything that has happened on the network. Each peer has its own copy, and it’s kept in sync across the network.
- Smart Contracts (Chaincode): These are the rules of the network. They define what happens when someone submits a transaction.
- Channels: Channels are like private group chats between specific organizations. Each channel has its own ledger, and data is only shared among the members.
- Membership Service Provider (MSP): This handles access control. It uses identities from the CA to determine who’s allowed to do what.
What You Need Before You Start Building Blockchain using Hyperledger Fabric
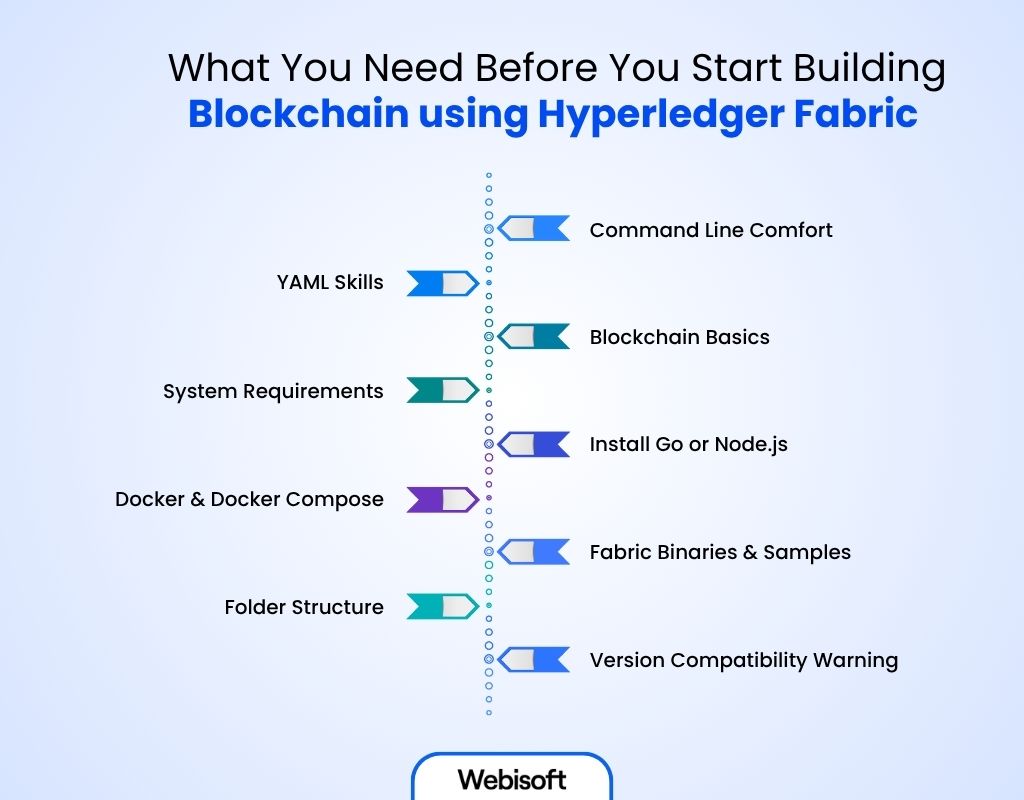
Before you start learning how to build a blockchain network using Hyperledger Fabric, you need to understand one thing: if your setup is messy or incomplete, you’ll run into problems fast. Here are some Hyperledger Fabric skills and tools you need to build a blockchain:
Command Line Comfort
There’s no GUI magic here. You’ll be generating certificates, spinning up containers, cryptographic material, and managing chaincode using CLI tools. Bash and basic terminal navigation are must-haves.
YAML Skills
Fabric’s network settings are written in YAML files. That means indentation matters. One misplaced space can break the entire network, and the logs won’t always tell you why.
Blockchain Basics
Understand how Fabric differs from other blockchain platforms. Grasp the roles of peers, orderers, consensus, and identity management in a permissioned setup. Plus, you also need to focus on understanding how Fabric works.
System Requirements
You’ll need at least 8 GB RAM, a Unix-based OS (Linux/macOS is ideal), and a stable internet connection. Fabric is heavy; don’t run it on a weak machine.
Install Go or Node.js
Chaincode, Fabric’s version of smart contracts, is written in Go or Node.js. You don’t need to be an expert, but you do need one of them installed and ready.
Docker & Docker Compose
Fabric runs each component, such as peers, orderers, databases, and even the CA, inside Docker containers. Docker Compose lets you start everything together. Make sure you’re using recent versions.
Fabric Binaries & Samples
Install the Fabric CLI tools and example networks using this command:
curl -sSL https://bit.ly/2ysbiFn | bash -s — 2.5.0 1.5.0
This gives you everything: cryptogen, configtxgen, peer, and a test network to practice on.
Folder Structure
Keep your project clean and modular. Here’s a layout that works:
/fabric-project/
├── chaincode/
├── config/
├── crypto/
├── docker/
└── scripts/
Version Compatibility Warning
This guide is based on Hyperledger Fabric v2.5.0 and Fabric CA v1.5.0. If you’re using newer versions, confirm CLI syntax and config file formats from the official docs.
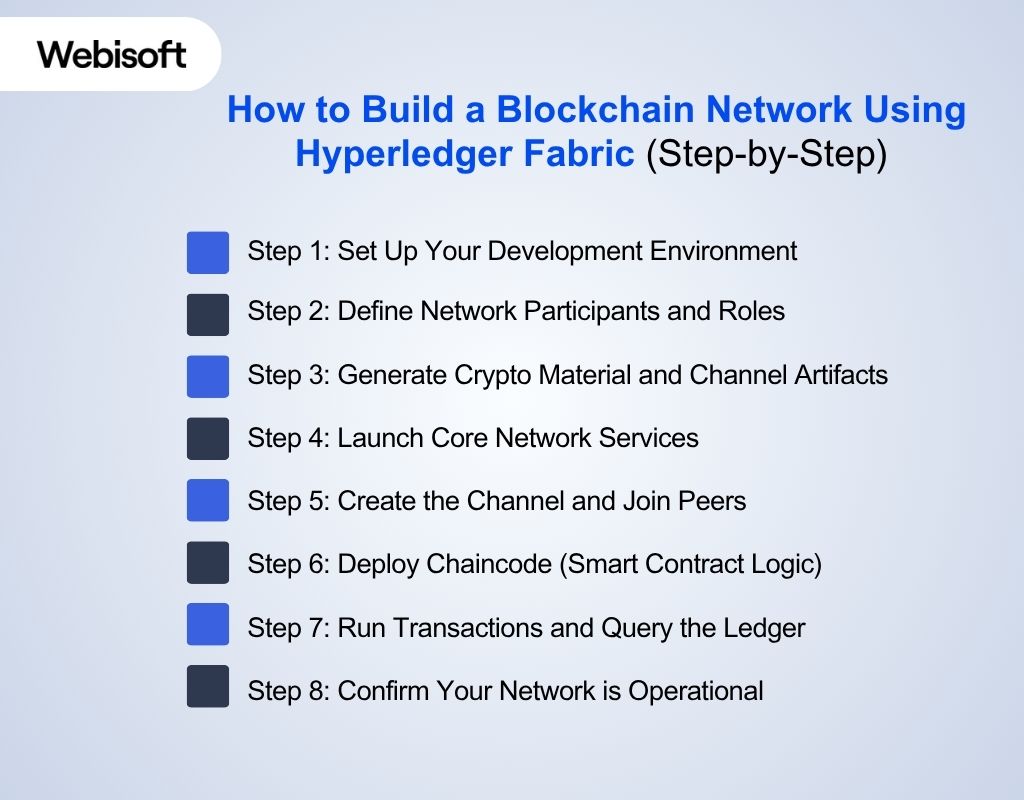
How to Build a Blockchain Network Using Hyperledger Fabric (Step-by-Step)
Before diving into how to build a blockchain network using Hyperledger Fabric, it’s important to understand where this guide operates. You’ll be building and running your network locally on your development machine using Docker containers and CLI tools.
This setup provides a safe, isolated environment for prototyping before moving to cloud-based or production-grade deployments.
Step 1: Set Up Your Development Environment
Before you create a blockchain network, you need a solid foundation. If you’ve already followed the setup checklist above, you’re good to go. Start by jumping into the test network directory provided by the Fabric samples:
cd fabric-samples/test-network
This is where you’ll run most commands as you build and interact with your network. Now, you will run the following commands directly in your terminal (Command Line Interface), not inside a Docker container. Open your terminal and run:
docker –version
peer version
These should return the installed version numbers. If they throw errors, your environment isn’t fully set up yet; revisit the setup steps above.
Next, confirm you’ve got the sample files in place:
- docker-compose.yaml: Defines how services run
- configtx.yaml: Used to generate channel config and genesis block
- crypto-config.yaml: Defines orgs, peers, and certs
We’ll start customizing these in the next steps, but for now, make sure everything’s right where it should be.
If your terminal can’t find these files or the peer CLI, it usually means your $PATH variable doesn’t include the Fabric binaries.
To fix it, add them to your path temporarily:
export PATH=$PATH:~/fabric-samples/bin
Or, for a permanent fix, add that line to your .bashrc or .zshrc file.
Step 2: Define Network Participants and Roles
Before your network can do anything useful, you need to decide who’s in it and what each party is allowed to do. It’s the foundation of trust and structure in your blockchain network. And in Hyperledger Fabric, nothing happens without clearly defined participants.
Choose the Organizations that will be Part of the Network
Each organization (or “org”) is basically a separate entity with its own peers, identities, and policies. For example, if you’re simulating a supply chain, you might have Org1 as the supplier, Org2 as the distributor, and Org3 as the retailer.
Decide Which Organizations will Host peers and Orderers
Not every org needs to run the full stack. Some might only have peers (to store data and run chaincode), while others might host orderer nodes to handle transaction sequencing. You can split the roles depending on whom you trust and what kind of control they need.
Figure Out Identity Management
Each org manages its own users, which means each needs its own Certificate Authority. That’s how identities are issued and verified in the network. Without proper identities, users can’t do anything.
Define Roles and Permissions
Who gets to endorse transactions? Who can update chaincode? Who’s allowed to create or join channels? These aren’t technical details; they’re business rules baked into the network through policies and MSPs.
Step 3: Generate Crypto Material and Channel Artifacts
The next step of how to build a blockchain network using Hyperledger Fabric is to bring the network’s identities and trust anchors to life.
You’ll generate cryptographic certificates (MSPs) for peers, orderers, and users, essentially the digital passports that allow components to securely talk to each other. You have two options here:
- cryptogen: simple, quick for dev/test setups
- Fabric CA: more flexible, used in production
To keep things simple for now, we’ll use cryptogen. Make sure you’re inside the directory where your crypto-config.yaml file is located. If you’re using the default Fabric test network, it’ll be:
cd fabric-samples/test-network
Then run:
cryptogen generate –config=crypto-config.yaml
This command will create a crypto-config folder containing all the certificates and keys for your network participants.
Step 4: Launch Core Network Services
Once your crypto material and configuration files are in place, it’s time to bring your network to life. This is where everything, like peers, orderers, and certificate authorities, starts working together.
You’ll use Docker Compose to launch your blockchain development with Hyperledger Fabric. These services are in isolated containers.
Now, move into the directory where your docker-compose.yaml file is located. If you’re using the default test network, it’s:
cd fabric-samples/test-network
Then start the network:
docker-compose up -d
This spins up the core components of the network in detached mode (running in the background). How to know if your network is running? Check that all services are up using:
docker ps
You should see containers like:
- peer0.org1.example.com
- orderer.example.com
- ca_org1
- couchdb (if you’re using CouchDB as the state database)
If they’re listed here, your network is up.
- CLI Output Example
To confirm a peer started correctly, check its logs:
docker logs peer0.org1.example.com
Expected output might include:
–> Starting peer node
–> Listening on 7051
–> Peer joined successfully
Step 5: Create the Channel and Join Peers
You now create a private channel where orgs transact. Go to the CLI container for your organization. If you’re using the test network, Fabric provides a script that sets environment variables and runs commands inside Docker:
cd fabric-samples/test-network
Then, run the CLI commands using Docker exec or predefined scripts. Here’s how:
Create the Channel:
Inside the test-network directory, run:
export CORE_PEER_LOCALMSPID=Org1MSP
export CORE_PEER_MSPCONFIGPATH=../organizations/peerOrganizations/org1.example.com/users/Admin@org1.example.com/msp
export CORE_PEER_ADDRESS=localhost:7051
Then create the channel using:
peer channel create \
-o localhost:7050 \
-c mychannel \
–ordererTLSHostnameOverride orderer.example.com \
-f ./channel-artifacts/channel.tx \
–outputBlock ./channel-artifacts/mychannel.block \
–tls \
–cafile “$ORDERER_CA”
Replace “$ORDERER_CA” with the actual path to your orderer’s CA cert, usually something like:
../organizations/ordererOrganizations/example.com/orderers/orderer.example.com/msp/tlscacerts/tlsca.example.com-cert.pem
Join the Channel:
Once the channel block is created, have your peer join it:
peer channel join -b ./channel-artifacts/mychannel.block
You’ll see a success message confirming the peer has joined.
Set Anchor Peers:
Anchor peers are special nodes that enable communication between organizations. Still, from Org1’s context, run:
peer channel update \
-o localhost:7050 \
–ordererTLSHostnameOverride orderer.example.com \
-c mychannel \
-f ./channel-artifacts/Org1MSPanchors.tx \
–tls \
–cafile “$ORDERER_CA”
You’ll repeat this for Org2 and others, switching the context and anchor file accordingly.
Step 6: Deploy Chaincode (Smart Contract Logic)
This is where you add the business logic to your blockchain. In Hyperledger Fabric, smart contracts are called chaincode. They define what transactions can do, like creating, reading, updating, or deleting assets.
Fabric uses a multi-step chaincode lifecycle process:
- Package
- Install
- Approve
- Commit
Run all these following commands from your CLI container (e.g., cli or Org1 CLI) with environment variables already set for your organization.
- In the test network:
cd fabric-samples/test-network
./network.sh up createChannel -ca
./network.sh deployCC -ccn basic -ccp ../asset-transfer-basic/chaincode-go -ccl go
But if you’re doing it manually (recommended for deeper understanding), then follow these custom steps:
- Your chaincode should be organized like this:
/chaincode/asset-transfer/
├── chaincode.go # Smart contract logic
├── go.mod # Go module with dependencies
├── metadata.json # Defines language, label, etc.
metadata.json example:
{
“type”: “golang”,
“label”: “basic_1”
}
Step-by-Step Deployment of Chaincode
- First, create a package chaincode by running the command from the CLI container:
peer lifecycle chaincode package basic.tar.gz \
–path ./chaincode/asset-transfer \
–lang golang \
–label basic_1
This creates a .tar.gz package you’ll install on all peers.
- After that, install chaincode:
peer lifecycle chaincode install basic.tar.gz
Verify installation with:
peer lifecycle chaincode queryinstalled
It will return a Package ID. Save it; you’ll need it for approval.
- Approve chaincode definition. Run as Org1 admin, replacing the PACKAGE_ID with the output from the previous step:
peer lifecycle chaincode approveformyorg \
–channelID mychannel \
–name basic \
–version 1.0 \
–package-id PACKAGE_ID \
–sequence 1 \
–tls \
–cafile “$ORDERER_CA”
Repeat this for each org.
- Opt for commit chaincode. This step is where the chaincode actually gets deployed to the channel. Once all orgs approve, open your terminal and run this from any admin peer CLI (like peer0.org1.example.com):
peer lifecycle chaincode commit \
–channelID mychannel \
–name basic \
–version 1.0 \
–sequence 1 \
–tls \
–cafile “$ORDERER_CA” \
–peerAddresses localhost:7051 \
–tlsRootCertFiles “$PEER0_ORG1_CA”
Replace cert and peer values as per your org setup.
Step 7: Run Transactions and Query the Ledger
Now that your chaincode is live, the next step of how to build a blockchain network using Hyperledger Fabric is to test it with a transaction.
First, make sure you’re inside the CLI environment for a peer (e.g., peer0.org1.example.com) and have the environment variables set:
export CORE_PEER_LOCALMSPID=Org1MSP
export CORE_PEER_ADDRESS=localhost:7051
export CORE_PEER_MSPCONFIGPATH=${PWD}/organizations/peerOrganizations/org1.example.com/users/Admin@org1.example.com/msp
Once your environment variables are set, you’re ready to test your chaincode by interacting with the ledger.
1. Invoke a Transaction
peer chaincode invoke \
-o localhost:7050 \
–ordererTLSHostnameOverride orderer.example.com \
–tls \
–cafile “$ORDERER_CA” \
-C mychannel \
-n basic \
-c ‘{“function”:”CreateAsset”,”Args”:[“asset1″,”blue”,”5″,”Tom”,”300″]}’
2. Query the Ledger:
peer chaincode query \
-C mychannel \
-n basic \
-c ‘{“Args”:[“ReadAsset”,”asset1″]}’
3. Expected Output:
–> Chaincode invoked successfully
{ “assetID”: “asset1”, “color”: “blue”, “size”: 5, “owner”: “Tom”, “appraisedValue”: 300 }
Step 8: Confirm Your Network is Operational
Run these checks:
- peer channel list
- peer lifecycle chaincode queryinstalled
- docker logs orderer.example.com
After the check, you need to make the following list:
- All services are running
- Peers show correct channel membership
- Chaincode responds to queries
(Optional) Step 9: Upgrade to a Production-Ready Setup
The last but optional step of how to build a blockchain network using Hyperledger Fabric is to prepare a production-ready setup. When moving beyond dev:
- Use fabric-ca for certificate management
- Switch from solo to Raft consensus
- Use private Docker networks, TLS, and backups
How to Know If the Blockchain Network is Working
So, you’ve gone through the setup, created channels, added identities, and activated chaincode, but how do you know it’s all actually working? Here’s what to look for:
- Peers are up and connected: Each organization’s peer should be running without errors and visible to the network.
- Channels are active: You should be able to query the channel and see that peers have successfully joined it.
- Chaincode is running: The smart contract should be installed, approved, and committed. If it’s live, you can start simulating real transactions.
- Transactions are being processed: When you submit a transaction, it should get endorsed by the right peers, ordered, added to the ledger, and reflected across the network.
- The ledger updates consistently: All peers involved in the channel should reflect the same state after a transaction; that’s the whole point of having a distributed system.
Troubleshooting Common Hyperledger Fabric Setup Errors
Here are common issues that may occur during the steps of how to build a blockchain network using Hyperledger Fabric:
| Common Issues | What’s Likely Wrong | How to Fix It |
| Peer failed to join channel | MSP mismatch or missing anchor peer config | Verify MSP IDs, check configtx.yaml, and confirm anchor peer updates were applied correctly |
| Chaincode won’t commit | Missing org approval or endorsement policy mismatch | Make sure all orgs are approved with matching names, versions, sequences, and endorsement policies. |
| Docker container restarts | Environment variables missing, incorrect volume mounts, or port conflicts | Check docker logs, verify volumes are mounted, and ensure ports like 7051/7050 aren’t blocked |
| CA isn’t issuing certificates | Incorrect config, server not running, wrong enrollment credentials | Confirm CA is live, validate usernames/secrets, and review fabric-ca-client-config.yaml setup |
What’s Next? Turn Your Network Into a Real Project
So you’ve got your network running. But now it’s time to add extra for the best result:
Add a UI with Node SDK
Your blockchain is live, but it’s not user-friendly yet. Use the Hyperledger Fabric Node SDK to build a front-end app so users can interact with the network, like submitting transactions or reading data, without touching the CLI.
Expand to 3+ Organizations
A single-org setup works for demos, but real use cases need multiple parties. Add more organizations to simulate trust boundaries, like a supplier, distributor, and retailer, all operating on the same chain with controlled access.
Deploy to the Cloud (AWS, GCP)
Running locally is great for testing, but cloud infrastructure gives you scalability, fault tolerance, and remote access, especially if you’re planning to build cross-chain bridge systems. Use services like Amazon EC2 or Google Compute Engine to deploy nodes, orderers, and CAs in a more production-like environment.
Automate with Bash or Ansible
Manually spinning up components gets old fast. Wrap your setup into Bash scripts for quick resets, or go further with Ansible to fully automate deployments, manage configurations, and ensure reproducibility. It’s a smart move for DevOps integration.
How Can Webisoft Help in Building a Blockchain Network using Hyperledger Fabric
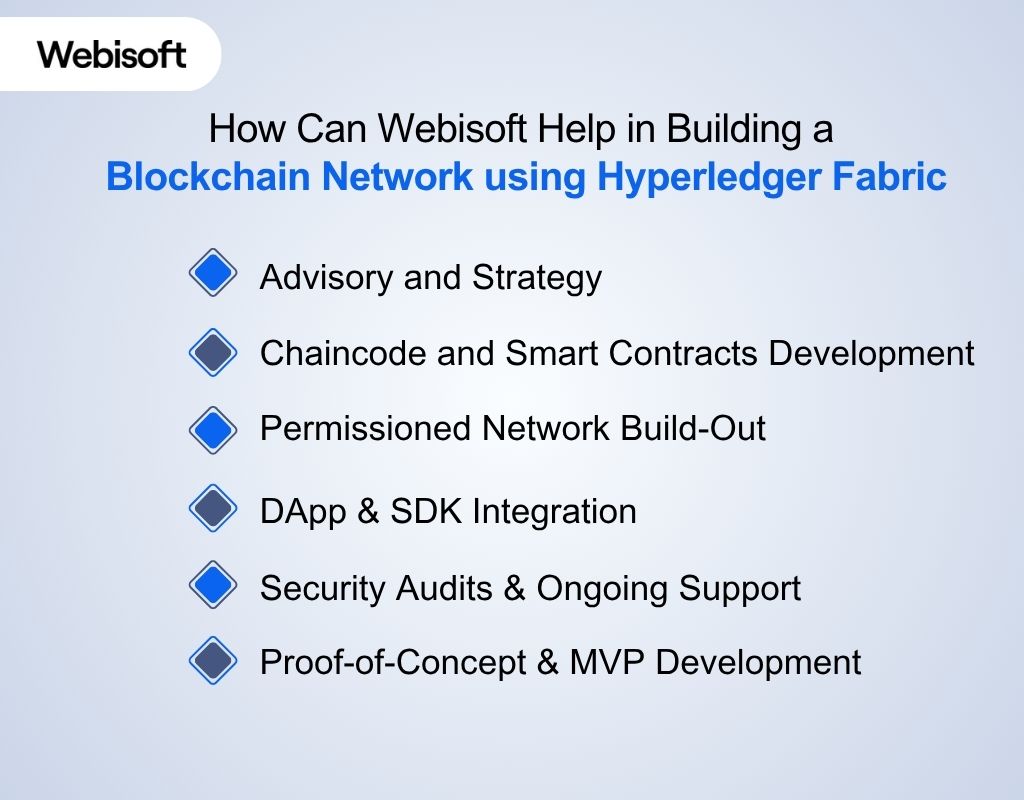
Building a blockchain network with Hyperledger Fabric can be complex. Webisoft’s expert team offers secure and scalable implementation and delivers a solution for your business needs, saving you time and minimizing risks.
Here’s how Webisoft helps in building blockchain networks using Hyperledger Fabric:
Advisory and Strategy
They start by understanding your specific goals and use case through advisory consultancy. This way, Webisoft can help you shape a permissioned Fabric network that aligns with real business needs.
Chaincode and Smart Contracts Development
Their developers craft, test, and deploy secure chaincode in Go or Node.js that fits your business logic.
Permissioned Network Build-Out
From CAs and MSPs to orderers and peers, Webisoft builds enterprise-grade Fabric networks that are resilient, compliant, and production-ready.
DApp & SDK Integration
They help you build user-facing applications, whether it’s APIs, dashboards, or React/Node UIs, that interact smoothly with your Fabric network.
Security Audits & Ongoing Support
Fabric readiness isn’t just about setup. Webisoft doesn’t stop there; they audit your environment, secure your infrastructure, and provide post-deployment maintenance.
Proof-of-Concept & MVP Development
Not ready for a full-scale launch? Webisoft helps by building POCs or minimal viable networks to test ideas fast and prove value before bigger investments.
Ready to build your own private blockchain with Hyperledger Fabric? Talk to Webisoft’s team and bring your vision from concept to production with confidence and clarity. Book a quote to contact Webisoft.
Conclusion
So, how to build a blockchain network using Hyperledger Fabric? You now know the step-by-step guide to building the network. It’s not just about spinning up containers; it’s about structuring trust, identity, and logic in a way that fits business needs.
Once you understand the pieces, it all clicks. And if you want to go from concept to production-ready, Webisoft is here to help you build something that gives you a professional service.
FAQs
Here are some commonly asked questions regarding how to build a blockchain network using Hyperledger Fabric:
Can I use Fabric without writing code?
Yes, to an extent. You can set up and run a Fabric network using config files and tools without writing smart contracts. But to add real business logic (chaincode), you’ll eventually need some coding, typically in Go or Node.js.
What industries are actually using Fabric?
Fabric is used across supply chain, finance, healthcare, insurance, and government. Companies like IBM, Walmart, and Maersk use it for practical applications like tracking goods, verifying transactions, and sharing data securely across partners.
Is Fabric free and open source?
Yes. Hyperledger Fabric is completely free and open source, maintained by the Linux Foundation. You can use it, modify it, and contribute to it, no licensing fees are required.
